
What to bring on a guided tour of Mount Teide
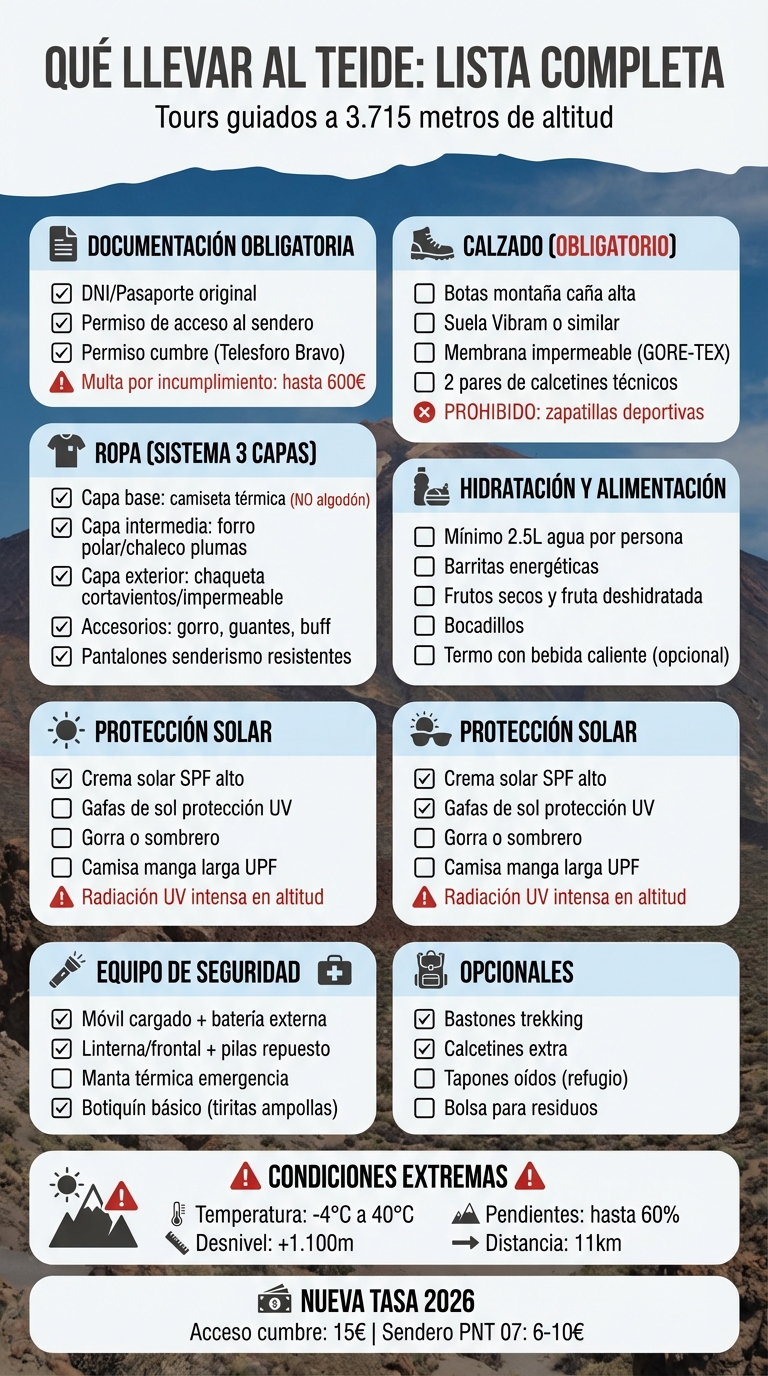
Mount Teide is no ordinary excursion. With altitudes reaching 3,715 meters and temperatures that vary dramatically, from -4°C in winter to 40°C in summer, you need to be prepared. Furthermore, from 2025, failing to comply with the mandatory equipment requirements could cost you up to €600. Here's what you need to know to enjoy the tour and avoid problems:
- Mandatory footwear : High-top hiking boots with a sturdy sole ( Vibram type) and waterproof membrane. Sneakers and open-toed shoes are not permitted.
- Layered clothing : Thermal base layer, fleece, and windproof or waterproof jacket. Add gloves, a hat, and a scarf if you're summiting.
- Hydration and food : Bring at least 2.5 liters of water per person and high-calorie snacks such as nuts or energy bars.
- Sun protection : High SPF sunscreen, sunglasses, and a hat. UV radiation is intense, even on cloudy days.
- Documentation and permits : Original ID or passport and mandatory permits to access trails and the summit.
- Safety equipment : Charged mobile phone, flashlight, thermal blanket and basic first aid kit.
Pack your backpack carefully, check the trail conditions before setting out, and prepare for a challenging but spectacular environment.
Complete list of essential luggage for guided tours in Teide
Hiking boots: mandatory footwear
On guided tours of Mount Teide, only high-top hiking boots are permitted . Conventional sneakers are prohibited for safety reasons, and guides may refuse to allow you to participate if you are not wearing appropriate footwear.
The volcanic terrain of Mount Teide is no ordinary trail. With slopes of up to 60% , its surface is covered in loose scree, pumice, and sharp edges of solidified lava. Regular hiking shoes don't offer the lateral grip or ankle stability needed for this type of terrain, especially on routes like Montaña Blanca (Trail No. 7), which has over 1,100 meters of elevation gain.
"For safety reasons, it is expressly forbidden to ride the cable car while wearing shoes with heels, wedges, platforms, water/beach shoes, flat shoes, or open-toed shoes." - Mount Teide
In addition to being high-cut, your boots should have a waterproof membrane (like GORE-TEX ) to adapt to changing conditions, from wet trails in the lower areas to snow and ice at the summit. A Vibram or similar sole is also essential to ensure traction on slippery surfaces, and full-length rock plates will protect your feet from sharp volcanic rocks that can puncture softer soles. Before starting your tour, make sure every technical feature of your boots is in perfect working order.
Footwear checklist
A pre-hike check can make all the difference on such demanding terrain. Inspect your boots before heading out: make sure the soles aren't worn or damaged in any way that could affect grip on rough terrain, as the volcanic soil will exacerbate any existing problems.
It's essential to break in your boots before the tour to avoid blisters during the 11 km hike. Bring two pairs of socks : changing into dry ones before the descent can improve your comfort and prevent chafing. If you haven't worn your boots in a while, try them on a hike over uneven terrain to ensure the ankle support is still secure and that you can lace them properly.
Choosing the right footwear is not just a matter of comfort; it is key to facing the challenging volcanic environment of Teide and complementing the rest of the essential equipment to guarantee your safety in the high mountains.
sbb-itb-2b14d48
Clothing: Layers for High Mountain Climate
The three-layer system is essential for coping with the conditions on Mount Teide, where temperatures can change by more than 20°C in a single day. Although the base layers may be warm, the cold at the summit (3,715 m altitude) requires full thermal clothing, even in summer.
These three layers—base, mid, and outer—work together to adapt to changing weather conditions. The base layer should be made of technical fabric or merino wool, as these materials wick away moisture. Avoid cotton, which traps sweat and can quickly cool your body. The mid layer, such as a fleece, down vest, or thermal sweater, helps retain body heat as you ascend. Finally, the outer layer, which can be a windbreaker or a waterproof jacket with a hood, protects against wind and sudden changes in weather.
"Conditions on Mount Teide can go from one extreme to the other – warm at the base, freezing at the summit, and everything in between." - Lava Land Tours
For your lower body, opt for sturdy hiking pants or tights. In winter or on night hikes, add thermal leggings for extra protection. Accessories like gloves, a hat, and a neck warmer or buff are essential, especially since your extremities lose heat quickly in the wind above 3,500 meters.
Mandatory Thermal Layers
In extremely cold and windy conditions, it's essential to pack your backpack as if you were facing all four seasons in a single day. A thermal jacket, preferably made of lightweight down or synthetic material, is indispensable for the summit, where the icy wind can make the wind chill feel much lower than the actual temperature. An emergency thermal blanket is also part of the mandatory equipment for high-altitude routes.
Furthermore, solar radiation is much more intense at higher altitudes due to less atmospheric filtration. Therefore, even if it's cold, it's advisable to wear a long-sleeved shirt with UPF protection. Don't underestimate the usefulness of a hat and gloves, as these small accessories can make a big difference when the wind picks up at the summit. Strategically layer your clothing so you can add or remove items as needed during the ascent.
With this layering system and the right accessories, you'll be ready for the extreme conditions of Teide, complementing the rest of your essential gear.
Water, food, and sun protection
On Mount Teide, staying hydrated isn't optional; it's essential. At an altitude that can reach 3,715 meters, the body requires more water and is more susceptible to altitude sickness. Therefore, carry at least 2.5 liters of water, although for full ascents, 3 to 4 liters is recommended. In addition, a thermos with a hot drink can be a great help at the summit, where temperatures can drop below 0°C, even in the middle of summer.
The best way to stay hydrated is by taking short breaks every 30 to 45 minutes, sipping small amounts of water and eating snacks. Avoid drinking large amounts all at once. Keep in mind that there are no shops or restaurants in the higher elevations, so you should bring everything you need with you from the start.
Water and snacks
To maintain your energy during the climb, opt for high-calorie foods such as energy bars, nuts, dried fruit, or sandwiches. If you need an extra boost on the more demanding sections, such as the 60% gradient from La Rambleta, nutrition gels or sugary foods can be very helpful.
"Bring high-calorie food: energy bars, dried fruit, sandwiches, or nuts. A hot drink in a thermos is great at the summit." – Arturas Jakubauskas, Lava Land Tours
If you plan to stop at the Altavista Refuge (3,260 meters), plan your stay carefully. There you can boil water and store your food before the final stretch to the summit. The stay costs around €25 per person and includes access to a shared kitchen. Also, bring a resealable bag to store food scraps and trash, as there are no bins along the trails.
Don't forget that, just like hydrating and eating well, taking care of your skin is essential.
Sun protection products
At high altitudes, UV radiation is much more intense. The thinner atmosphere filters out fewer ultraviolet rays, increasing the risk of sunburn, even on cloudy or cool days. To protect yourself, be sure to bring:
- Sunscreen with high SPF
- Sunglasses with high UV protection
- Cap or hat
- Long-sleeved shirt with UPF rating
Apply sunscreen before starting your hike, even if you're setting out at dawn, as the sun will be intense during the descent. Don't be fooled by a cool breeze or fog: UV radiation remains high regardless of the temperature. Sunglasses are essential to protect your eyes from the intense sunlight, especially when you're passing through the "sea of clouds."
Safety equipment and mandatory documentation
On Mount Teide, ensuring safety involves more than just wearing appropriate mountain clothing and carrying water. National Park authorities require not only the correct equipment but also the necessary documentation. Without these items, you could be turned away. Here's what you need to meet the requirements.
Safety equipment
It's essential to carry a fully charged mobile phone , a flashlight with spare batteries , and an emergency thermal blanket . Temperatures at the summit can drop below 0°C even in summer, and the cold can quickly drain your phone's battery. Therefore, include an external battery in your kit. Other recommended items are an emergency whistle and a basic first-aid kit , ideally with blister plasters.
Failure to comply with these requirements can be costly: fines can reach up to €600 , and if you need rescue due to negligence or lack of equipment, the costs could range from €2,000 to €12,000 .
In addition to the equipment, it is essential to have all the required documentation to access the park.
Permits and documentation
To hike the high mountain trails of Mount Teide, you need two mandatory permits: one for general access to the trail, which is managed through the Tenerife ON platform, and another specific one for the Telesforo Bravo section (PNT 10 trail) if you plan to reach the summit. You can carry these documents printed or saved on your mobile phone.
Don't forget to bring your original ID card or passport , as it must exactly match the name on the permits. Digital copies or photographs are not accepted at checkpoints. Furthermore, the permits are non-transferable and issued in the name of the person making the permit.
From January 18, 2026 , an environmental fee will be applied to access the PNT 07 and PNT 10 trails. For the summit, it will be €15 for general visitors, while the PNT 07 trail will cost between €6 and €10 , depending on the day.
Optional items for added convenience
In addition to the mandatory equipment, certain extras can make all the difference to your experience on Mount Teide. For example, trekking poles are ideal for maintaining stability on volcanic and rocky terrain. They also help relieve pressure on your knees, something you'll appreciate on demanding routes, such as 1,400-meter descents over 11 kilometers. Your joints will thank you.
Another useful accessory is a thermos of hot beverage . After physical exertion, a sip of tea or coffee is not only comforting but also helps maintain body temperature, especially when temperatures at the summit hover around 0°C.
If you plan to take a lot of photos or use electronic navigation devices, an extra external battery is essential. The low temperatures at 3,715 meters can drain batteries faster than normal. To prevent this, store the battery in an inside pocket, close to your body, to protect it from the cold.
Also, consider bringing extra socks , earplugs if you plan to stay overnight at the Altavista Refuge, and a trash bag to keep the environment clean.
Trekking poles and basic first aid kit
Trekking poles are especially useful on steep sections, such as the ascent of Lomo Tieso, where inclines can exceed 60%. If you're participating in a guided tour, many operators include them in the price, so it's worth confirming this before buying them. On nighttime descents over loose volcanic rock, these poles are essential for protecting your joints.
On the other hand, a basic first-aid kit is an essential addition. This should include your usual medications, pain relievers for any aches and pains (including those caused by altitude), and, above all, blister plasters like Compeed . Uneven terrain and long distances can increase the risk of blisters, and these plasters are an effective solution to prevent discomfort.
Complete packing list for tours in Teide
Here's a handy checklist with everything you need for your trip to Mount Teide. You can save it to your phone or print it out so you don't forget anything:
| Category | Essential items | Preparation Notes |
|---|---|---|
| Documentation | ID/Passport, Access Permit, Summit Permit | Please ensure the names match the reservation. You can provide them in digital or printed format. |
| Footwear | Hiking boots, 2 pairs of socks | It is essential that they have soles with good grip for volcanic terrain. |
| Clothing (layers) | Thermal t-shirt, fleece, windproof jacket | Use layers to adapt to temperature changes. Avoid cotton. |
| Accessories | Hat, gloves, neck gaiter or buff, sunglasses | Even in summer, they are essential to protect you from the wind at the summit. |
| Sun protection | High SPF sunscreen, sunglasses, cap or hat | UV radiation is very intense at an altitude of 3,715 meters. |
| Hydration | At least 2.5 L of water per person | You won't find any water refill points along the trails. |
| Feeding | Energy bars, nuts, snacks, fruit | Bring high-calorie foods and, if you can, a thermos with a hot drink. |
| Equipment | Headlamp with spare batteries, 20-30 L backpack | A headlamp is mandatory on sunrise or sunset tours. |
| Safety/Health | Personal medications, blister plasters, external battery | Remember that the cold can quickly drain your mobile phone's battery. |
| Optional | Trekking poles, earplugs (shelter), trash bag | Trekking poles help reduce pressure on the knees during descents. |
Important tips :
- Pack your backpack the night before and make sure you have all the necessary permits and equipment. Rangers can issue fines of up to €600 if you don't comply with the requirements.
- Before heading out, check trail conditions on official websites like volcanoteide.com , as they may be closed due to weather conditions such as wind or ice.
- Avoid leaving valuables in your rental car when you park near the trails.
FAQs
Can I rent boots and walking sticks for Mount Teide?
It is advisable to wear appropriate footwear, such as hiking boots, for traversing the rocky terrain of Mount Teide. It is not mentioned whether boots or walking sticks can be rented, so it would be wise to check this option before your visit.
How do I know if I need a permit to summit?
From November 2024, a permit will be required to access certain routes on Mount Teide, including the route to the summit. Additionally, starting in 2026, an ecotax will be implemented for the PNT 10 Telesforo Bravo trail and other related routes. It is important to review the current regulations to ensure you meet all requirements before planning your visit.
What should I do if I'm affected by the altitude during the tour?
If the altitude of Mount Teide affects you, take precautions to minimize symptoms. Ascend gradually , stay well hydrated, and avoid alcohol, smoking, or strenuous exercise. Opt for light meals and, if needed, rest at lower altitudes to recover.
If you experience severe symptoms such as difficulty breathing, vomiting, or confusion, seek medical attention immediately . Additionally, if you have a chronic condition, are pregnant, or are traveling with children, it is advisable to consult a doctor before taking the tour . Your health is our priority.